Disabling Windows defender real time protection is usually needed when you want to access certain programs or applications. The goal is to be able to run and run smoothly.
Perhaps the most annoying thing you have ever encountered when using Windows defender.
Antimalware executable service takes ram and makes it slow
Antimalware executable service is part of Windows defender. which sometimes does eat a lot of ram and makes it slow. That happened because maybe Antivirus was scanning and the process was running in the background. How to fix it anyway you can turn off Windows Defender for a while.
Windows Defender uses a lot of disks and CPUs up to 100%
Maybe someone is experiencing this problem, indeed it happens because Antivirus is doing automatic scanning. And it runs on the Antimalware service executable process.
Or if when you browse files or open a folder that contains many files Antivirus will usually monitor the files that are displayed.
Then it can cause the work done Antivirus to be harder. Which might make the CPU and Disk performance can reach 100%.
Built-in security on the Windows 10 operating system is very useful. Actually it has been present since the time of Windows 7. There are many features, such as real time protection (antivirus), firewall, network protection, application control and others.
How do you turn off Windows defender?
Protection provided by Microsoft is not inferior to other antiviruses. Both in terms of security that is quite powerful and its performance is stable and lightweight. And will always be updated via Windows Update.
Windows defender or the new name Windows Security can be turned off in several ways. Like turning off via the settings, if you want to turn off for a while.
Or by modifying the system so that Windows Defender Security dies permanently. Among them using the registry editor and also Group Policy .
How to Turn off Windows Defender for a while
To turn off for a while we can do it directly through the settings in the Windows security settings.
1. First open START, and type “Windows security”.
2. Then click the application called Windows security to open it.
3. The antivirus application program will open later. There you select the Virus & threat protection menu .
4. In the Virus & threat protection settings section , underneath that you click Manage settings .
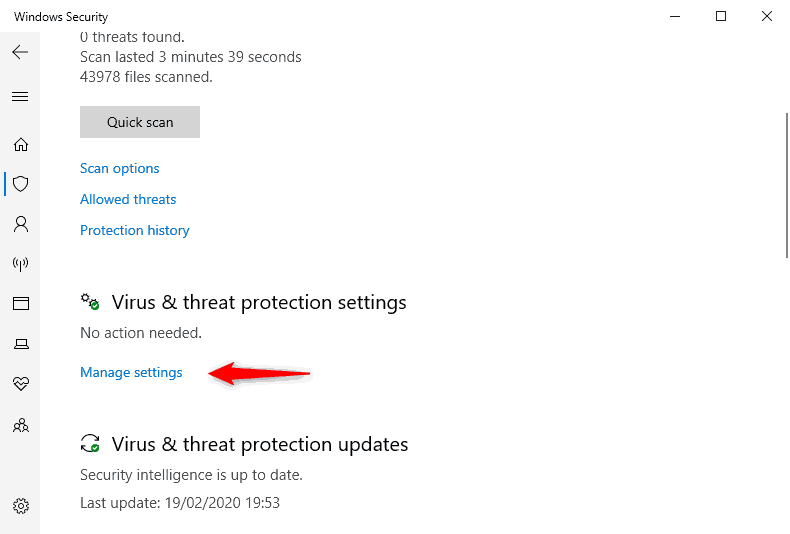
Well here will be any task that is carried out Windows security antivirus.
- Real-time protection functions to protect directly. This means that all will be monitored, both applications that are running and files that are not running.
- Cloud delivered protection functions to send virus samples found by windows security to the Microsoft database.
- Automatic sample submission , its function is to control whether the shipment of virus samples is carried out automatically or not. default ON
- Tamper protection serves to prevent malicious applications from changing settings on Windows Defender, including the user.
5. In the real-time protection task section that will always monitor the activity and do the scanning at a certain time. And it will run automatically.
Underneath that there is an on / off button you click to disable Windows Security.
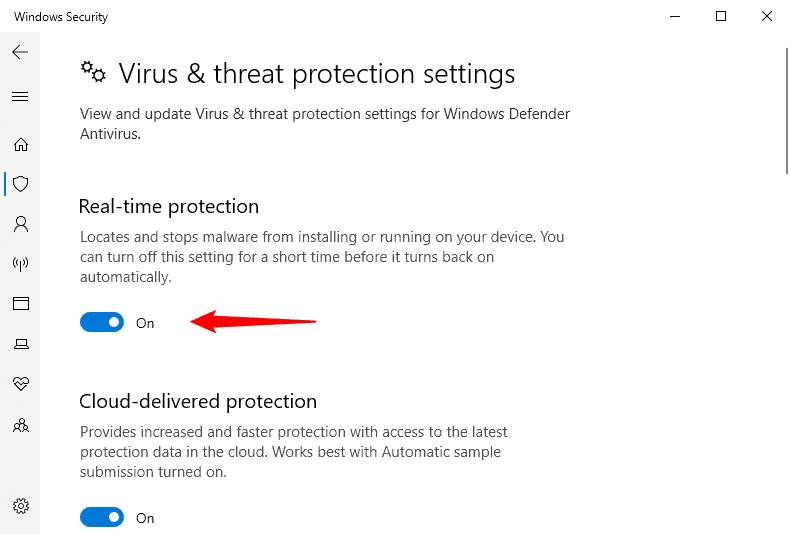
6. A warning will appear from the User account control that will request access / permission to deactivate real-time antivirus protection . And you give Yes access to allow it. DONE.
Now Windows Defender has been turned off. And this will only last until you do a shutdown or restart.
So after you shutdown or restart, when the Antivirus starts it will automatically reactivate. Because by default the tray is set to always be active.
How to Disable Windows 10 Defender Security Permanently
Next is the way to permanently turn off. You cannot do this via settings alone. This means we also have to force it through the direct system.
Calm down isn’t difficult. There are 2 ways that you can use, namely using a group policy or registry editor.
Before that it is important for you to know, that the new version of Windows Defender has a feature called Tamper Protection . These features prevent the task of protecting the antivirus so that it cannot be turned off by any method, except through settings (such as the temporary methods above).
So before starting how to permanently disable Windows 10 Antivirus you have to turn off this Tamper Protection feature. How:
1. You first open the Antivirus. by clicking / opening START and typing “Windows security”. Then open the application.
2. Click Virus & threat protection .
3. Underneath the Virus & threat protection settings , click Manage Settings .
4. Scroll down and look for “Tamper Protection”. Then below that there is a button, click to change the ON condition to OFF.
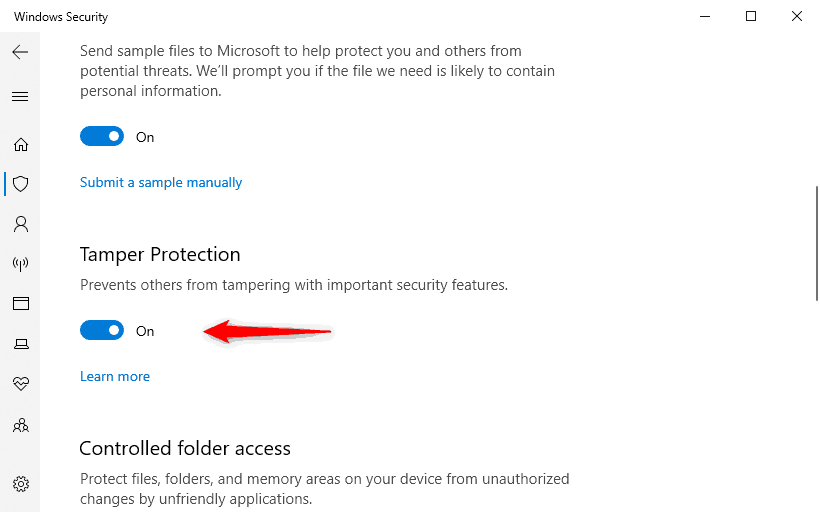
5. A permission request will appear from the User account control , you give YES access.
After completing the tamper protection, Antivirus is no longer protected. Furthermore, you have begun to disable it permanently.
Disabling Windows Defender Through Group Policy
Before starting you need to know, the Group Policy feature is not available in the Home version of Windows. That is, if you are a Windows 10 Home user you can use the registry editor method (below).
Now we will begin to completely shut down Windows defender. Later we will change the 4 settings. Straight to.
* Tamper protection must be turned off first. As discussed above.
1. First open START and type “group policy”.
2. Then select / click the tool called Edit group policy to open it.
* Alternatively, you can use Run, how to open run by pressing WIN+ Rand entering the keyword “gpedit.msc”, then click OK.
3. Group policy settings open, on the left you will see a list of folders. You select and go to the folders, the following steps:
- Select and double click the Computer Configuration folder .
- In it select and double click Administrative Templates
- Inside, select and double click Windows Components
- Finally, scroll, select and click Windows Defender Antivirus
4. Look at the right side, select and double click Turn Off Windows Defender Antivirus .
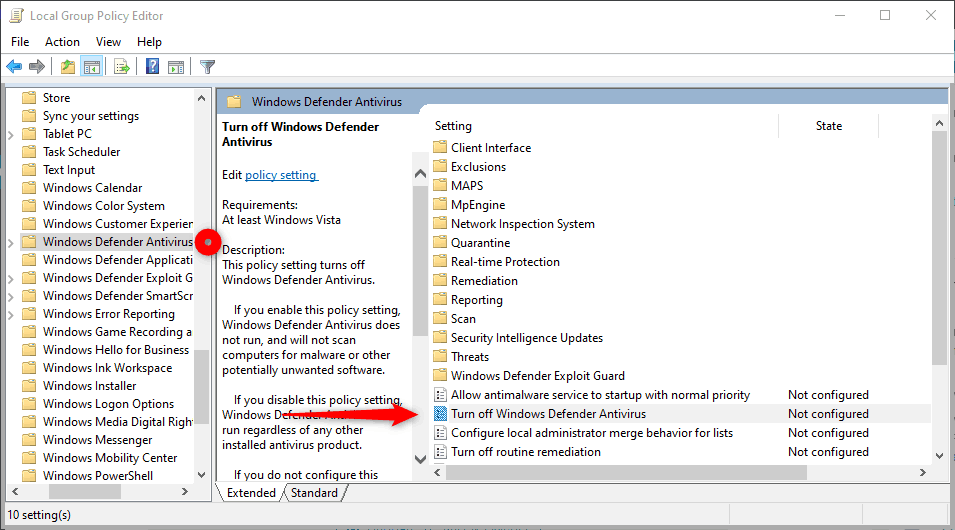
5. The settings box will open, the default setting is Not Configured, then you change it to Enabled like this. Then click OK to apply changes and at the same time close the settings box.
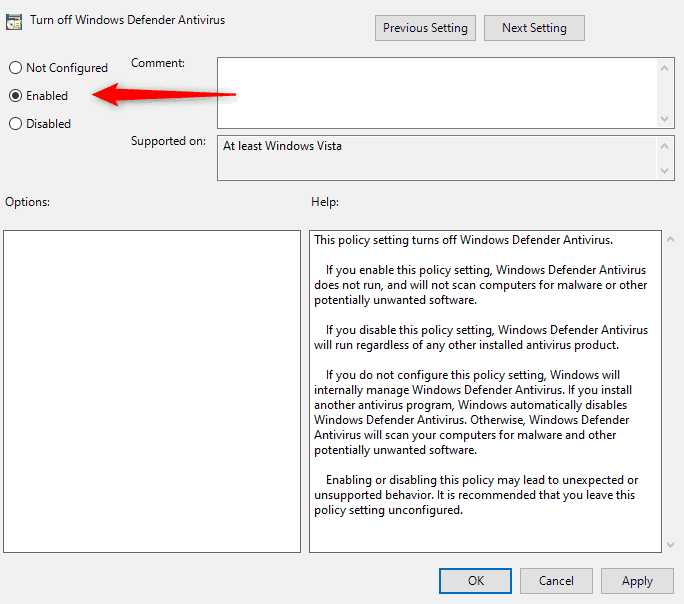
6. And finished, Antivirus has been turned off. You can still open Windows Security, because what is turned off is only Antivirus or Virus & thread protection .
If after you open-open the antivirus does not die in some time. You just restart the PC to immediately apply the changes.
To reactivate Antivirus you must enter the folder and settings as above. And restore the settings from Enables to Not Configured .
Disable through the Registry Editor (Regedit), for Windows Home users
How to permanently disable it by other means can use Regedit. Here as an alternative for Home version users. Because the home version doesn’t have a group policy tool.
Following are the steps to disable Windows Defender via Registry Editor or Regedit.
* Tamper protection must be turned off first. As discussed above.
1. Open START, type “regedit” or “registry editor”. Later there will be a tool called Registry Editor , click on it to open it.
* Or you can also open it with RUN. how to press WIN+ Rand enter “regedit”, and click OK.
2. After opening look at the left. There will be several folders, you go to the following folder sequence.
HKEY_LOCAL_MACHINE\SOFTWARE\Policies\Microsoft\Windows Defender
Or you can also copy it and paste it into the line above, press enter.
3. Now in the last folder that is Windows Defender you right-click, then move the cursor to New . In the selection option that appears, you just select / click ” DWORD (32-bit) Value “.

4. New items will be added to the right. And give the name DisableAntiSpyware , then press enter.
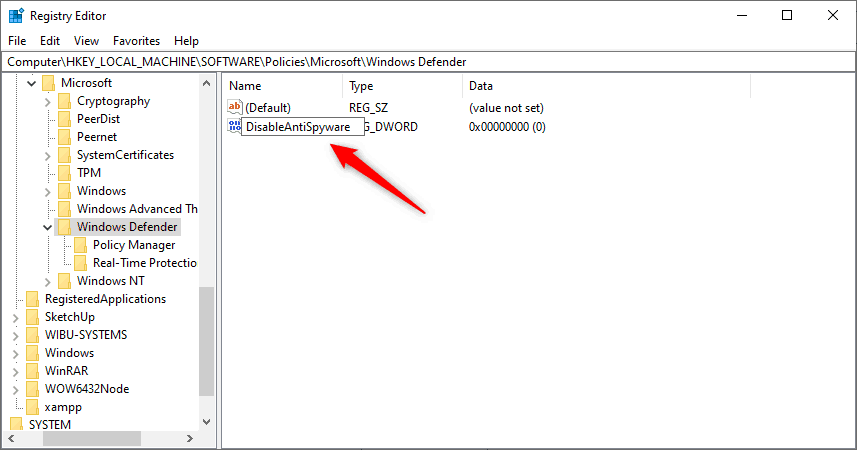
5. Double-click the item that you created earlier to open it. After that you give a value of 1 (number one). And click OK.
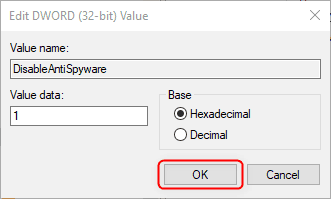
6. Done, then you just restart your PC to apply changes.
To reactivate Antivirus you have to look for another DisableAntiSpyware item that you have created. After you find it, change the value to 0 (zero) and the antivirus will restart, you restart.
These problems can also be a reason for you to turn off Antivrus from Microsoft for a while.
Actually turning off Antivirus is not recommended, because it is for security. So when your Antivirus is dead, stay alert.
* I am not responsible if there is damage. Although actually the ways that I have explained are really not problematic.
![Windows 11 22H2 New Features [2022 Update] Tab File Explorer](https://en.sepoin.com/wp-content/uploads/2022/08/Tab-File-Explorer-300x183.jpg)
